MongoDB 初始化配置及基础操作
==首先先要连接到MongoDB==
连接数据库
使用
mongo连接如果是
docker启动的MongoDB1
docker exec -it <MongoDB容器名称> mongo
登录帐号
1
2
use admin
db.auth('root','example')
一. 初始化配置
新增用户
1
2
3
4
5
6
7
8
9
10
11
12
13
use reporting
db.createUser(
{
user: "reportsUser",
pwd: passwordPrompt(), // or cleartext password
roles: [
{ role: "read", db: "reporting" },
{ role: "read", db: "products" },
{ role: "read", db: "sales" },
{ role: "readWrite", db: "accounts" }
]
}
)管理用户权限
二. 操作
1. 创建数据库
use <数据库名称>
2. 创建用户
1 | db.createUser({ |
3. 登录
1 | #连接数据库 |
4. 插入数据
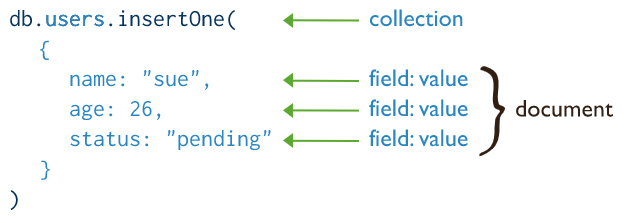
== 关系型数据库中的数据表,在MongoDB中称为collection ==
5. 查询数据
`](https://docs.mongodb.com/manual/reference/method/db.collection.updateOne/#db.collection.updateOne) * [`db.collection.updateMany()`](https://docs.mongodb.com/manual/reference/method/db.collection.updateMany/#db.collection.updateMany) * [`db.collection.replaceOne()`](https://docs.mongodb.com/manual/reference/method/db.collection.replaceOne/#db.collection.replaceOne) {% asset_img image-20200513150557524.png")
7. 删除数据

三. 备份
1 | # ① 在容器内部生成备份 |
四. 还原
1 | docker exec -it <mongodb容器名称> mongorestore -h localhost -u <管理员帐号> -p <管理员密码> --dir <存放备份的路径> |